Installing a customer
The five-step customer install workflow: create the account, pre-qualify with a line-of-sight path plot, capture contact information, schedule the install, and add the service plan.
Step 1: Creating an Account
There are no limits to the number of customer accounts you can create in Swift Fox, and because you are only billed for the accounts that have active network services or billing entries - there’s no reason not to create accounts for all sorts of reasons.
- Click “New Client” under the Clients menu on the left.
- Enter the name for the account. If you use “Firstname Lastname”, “Lastname, Firstname”, or “LASTNAME Firstname”, Swift Fox will automatically figure this out for the customer contact.
- A five digit account number will be automatically created. This is what the customer will use to log into their portal, or to pay their bill through their bank. You can change it if you use a different style
- The initial account status will be set here. Most ISPs will create all customers as a “Sales Lead” or “Waitlist”, and switch them into Active once installed. You can set the default status by clicking the radio button under Clients → Settings.
Step 2: Pre-Qualify Path Plot
Before you finish creating the customer account, you have the ability to see if the customer has line of sight to one of your towers. This is very useful if you’re on the phone with a new signup and you want to verify they’re in the coverage area.
- Start typing the address in the “Mailing Address” field to get an auto-complete box. If you see the correct address appear in here, click it to fill in the rest of the fields automatically. Canadian addresses may require the postal code to be finished manually.
- If an address was selected from the autocomplete, then the customer should immediately appear on the map to the right, as well as a coloured line showing the closest tower site. If not, you can click anywhere on the map to manually add the customer to it, based on the directions that they provide, and drag the customer to the correct location if need be.
- Once the customer is on the map, click the coloured box in the centre below the map. This will bring up a path profile between the customer and the tower. If it says “Clear Line of Sight” and is green, then you should be good to go, proceed to the next step. If it’s anything else, then there might be a hill in the way. You can select another tower from the dropdown on the right, or adjust the customer’s height using the slider.
- You can turn Land Cover on or off with the button in the middle - this is an approximation based on old satellite data, so take it with a grain of salt, but it can be useful in conjunction with the satellite view (click the icon in the top-right of the map to toggle that).
- If it’s clear they are not in your coverage area, be sure to still save the contact info and set their status to “Waitlist”. The customer will appear on the network map, and this will make it easy to find them again if you build a new tower in the area.
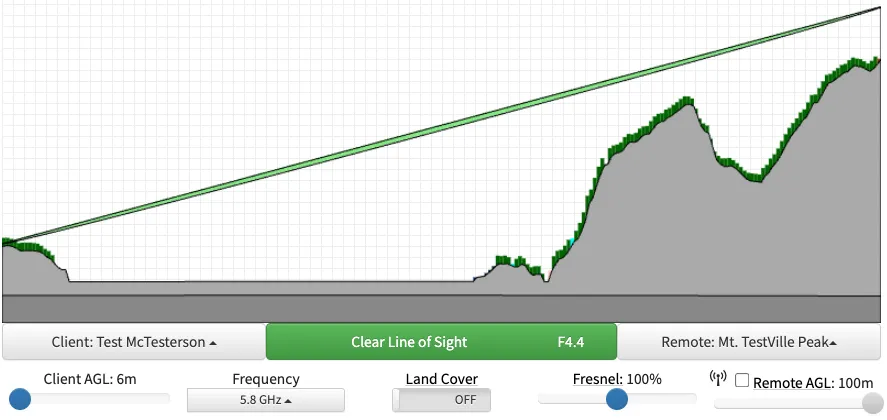
A clear line-of-sight path plot to the nearest tower.
Step 3: Contact Information
By default, Swift Fox will require at least a name and address to finish setting up an account. You can also enter phone numbers, email addresses, and other custom fields. If there is a field type that you would like that is not available, please contact Swift Fox to have it added.
- Enter a phone number as well as an optional description (“Home”, “Cell”, etc.), or if you don’t want to enter one at this time, simply click “Delete” next to the phone number field
- Same thing for the email field. Make sure to click “Primary” if there is more than one email address, as this will be the one that receives Internet bills
- At this point you can set up the customer portal password if you like, or you can wait until the installation date to do this. Once an email is configured on the account, you can have the system automatically send an email template with the new customer portal password and login by clicking the “Auto Generate and Email Password” button.
- Some areas do not use physical addresses, in which case you will want to enter the directions to the customer location in the “Directions” field. If you enter something in here, it will show up on the schedule agenda for field techs to find it
- Click the big green Save button at the bottom when you are done
Step 4: Schedule an Install
Assuming that you are taking a new signup, the next step would usually be to schedule an installation. You can do this easily from within the customer account page.
- Click on the Support tab (if you are using the tabbed view), and click “New Scheduled Item”. Alternatively you can do this from the Schedule page, by finding the day that you want and clicking “New Item”.
- If you got here from the customer page, pick a date by clicking on the “Scheduled Date” box. On the calendar you will see tiny numbers representing the number of service calls, installs, infrastructure calls, and other calls on each day.
- If you got here from the schedule page, type the name of the customer in the “Account” box and select the customer account from the auto complete
- Set the time of day to start the appointment in the top-right, and the expected end time below that. This is generally recommended for installs, but is optional for all types of scheduled item - and many ISPs do not schedule specific times for service calls or infrastructure work.
- In the big description box, enter any details that are required for the technicians. For an install, this might be directions on how to find the place, or instructions about dogs or gates.
- Click “Save”
- You’ll now be on the schedule for that day, with the new item sitting in the “Unassigned” column. For ISPs with only one crew, you could leave it there and it would work fine - but if you have more than one crew, you’ll want to drag it to the correct one. Crews are set up under Schedule → Settings.
- If a scheduled item does not have a specific time, you can drag it between other items on the day to set the order that field techs will do them in
- When it’s time for a crew to start their day, they can either print off the day’s details from the Schedule → Agenda page (by clicking “Print Agenda” in the top-right), or they can sync their phone’s calendar to the Swift Fox schedule by using the iCal link on the Schedule → Settings page. Alternatively, the Swift Fox schedule is designed to work on mobile browsers if there is cell coverage available.
Step 5: Add the Service Plan
For many ISPs, this step will be done at the installation, with the customer present - but some may prefer to do a portion of it before the installation on the initial phone call. Both are supported, but the CPE must be added at the install unless the specific radio MAC is known and set aside for the customer.
- There are two types of service plans, “Internet” involves network equipment that is monitored, can be disconnected, etc. - and “Generic” is for everything else (like email, web hosting, television, etc.)
- If the customer is choosing their Internet Plan on the initial phone call, then on their account go to the “Billing” section and click the “Suggested” tab. Select the package from the dropdown here and click Add. This is all you’ll need to do in order to prepare the next step for the installer
- Install the customer’s Internet service, with the radio on a temporary IP address for now.
- Once the installation is complete, if the billing package has been suggested already, then go to the same tab and click the package name from the list. If there has been no suggested plan, click the “Add Service” button at the top, and then click Internet.
- In the Add Circuit window, pick the access point that the customer is connected to from the “Connected To” dropdown. Any MAC addresses found on this AP should show up below
- Click the correct MAC address for the radio. If it doesn’t show up, try searching for it in the “Search for MAC” box. If it still doesn’t find it, enter the full MAC address here and the system will attempt to locate it later.
- You should see an IP Address appear, make note of it - as this is the IP address you should configure into the customer radio
- Set the device ownership, service start date, and the service plan (if not already chosen from the suggested plan feature)
- Click “Add Service” to add it to the account. You should see it appear now with empty pinglogs.
- Click the “Connection Test” button to do a real-time connection test to this radio. Assuming it has been configured on the correct IP address, you should see green bars and a low latency. This means the customer is set up correctly.
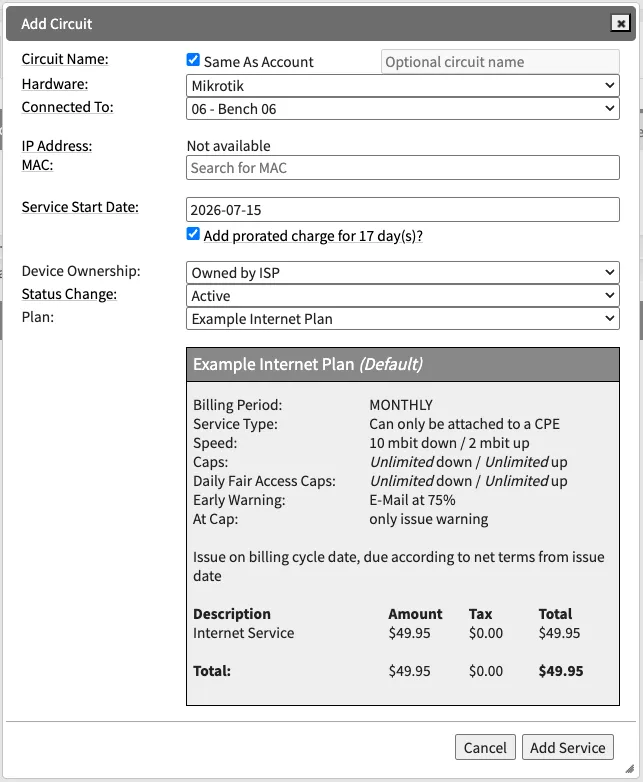
The Add Circuit window: pick the customer radio's MAC and service plan.
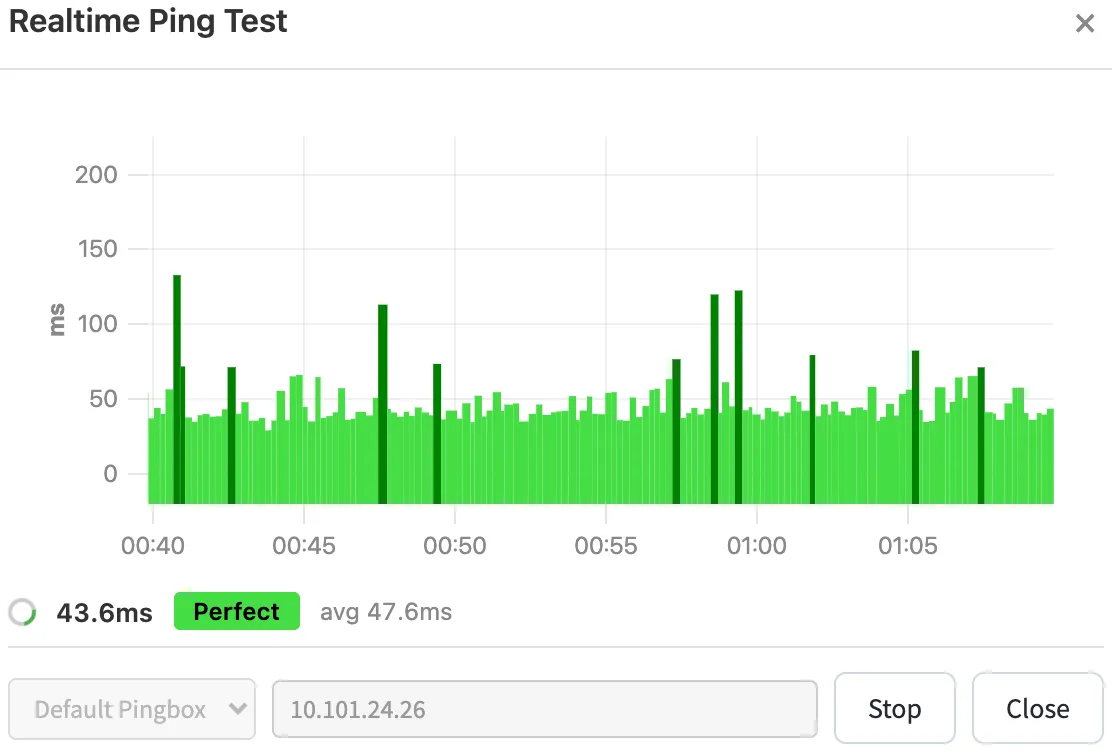
A successful real-time ping test against the new circuit.